 SECTIONS
The Revenue Contracts for Revenue Cloud feature configures a standard setup to create revenue contracts for Salesforce orders via engagements. An engagement can be linked to an order and its related order amendments. By creating a revenue contract for the engagement, the original order and any order amendments are managed on the same revenue contract.
If you intend using the Revenue Contracts for Revenue Cloud feature to create revenue contracts for Salesforce orders, you must configure the flow described here. The flow automates the creation of an engagement when a new order is activated, and writes the same engagement number to any related order amendments.
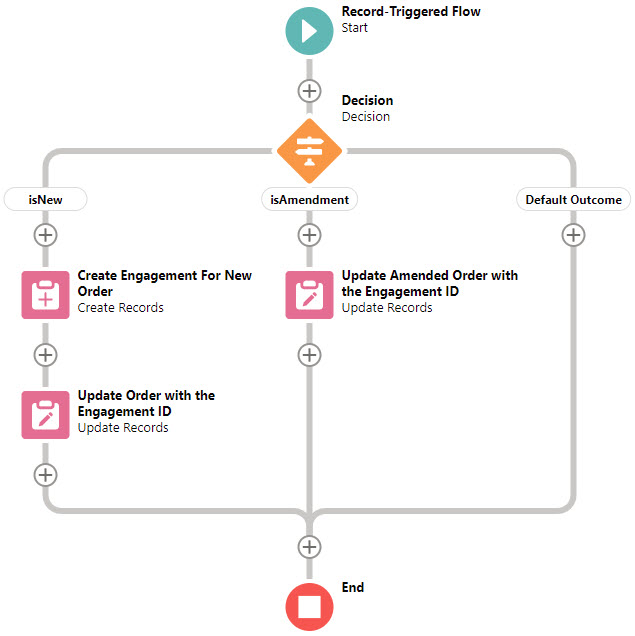
Here is an outline of the flow you will be building. (Click the image to expand it.)
Before You Begin
Before you begin you must enable the following in Feature Console:
- The Enabling Revenue Cloud Connector feature.
- The Create Setup for Using Revenue Contracts feature.
- Feature steps 1-4 of the Enable Revenue Contracts for Revenue Cloud feature. Feature step 5 refers to these instructions.
Make sure the Revenue Management on SF Revenue Cloud permission set is assigned to you.
Creating the Flow
- From Setup, navigate to Flows. Create a new flow of type Record-Triggered Flow. We recommend you use the Auto-Layout option to build the flow.
- Click the Start icon in the flow.
- Click Edit to configure the trigger. On the Configure Trigger window, set:
Trigger the Flow When: A record is created or updated
Run the Flow: After the record is saved - Click Done.
- Click Choose Object and complete the Choose Object window as follows:
Object: Order
Condition requirements: All conditions are met (AND)Then add the following conditions:
ffrrEngagement__c Is Null TrueStatus Equals ActivatedWhen to Run the Flow for Updated Records: Every time a record is updated and meets the condition requirements
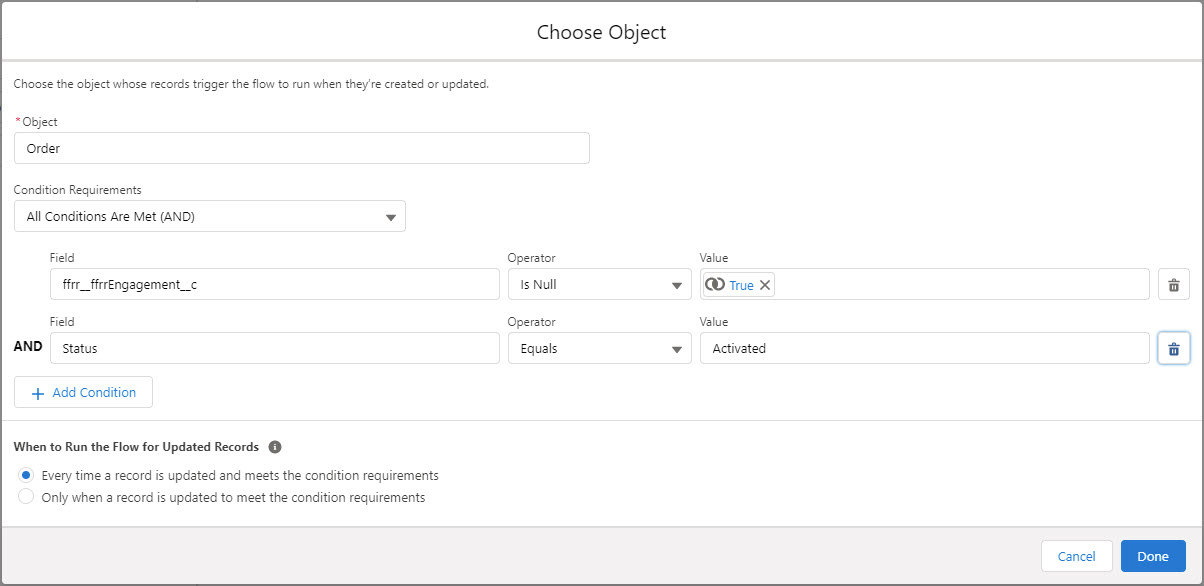
- Click Done.
- Click the + symbol between the Start Icon and the End icon, then choose to add a Decision element.
- On the New Decision window, enter a label and API name then for the first New Outcome, set:
Label: isNew
Condition requirements: All conditions are met (AND)Add the following condition:
{!$Record.Type} Equals New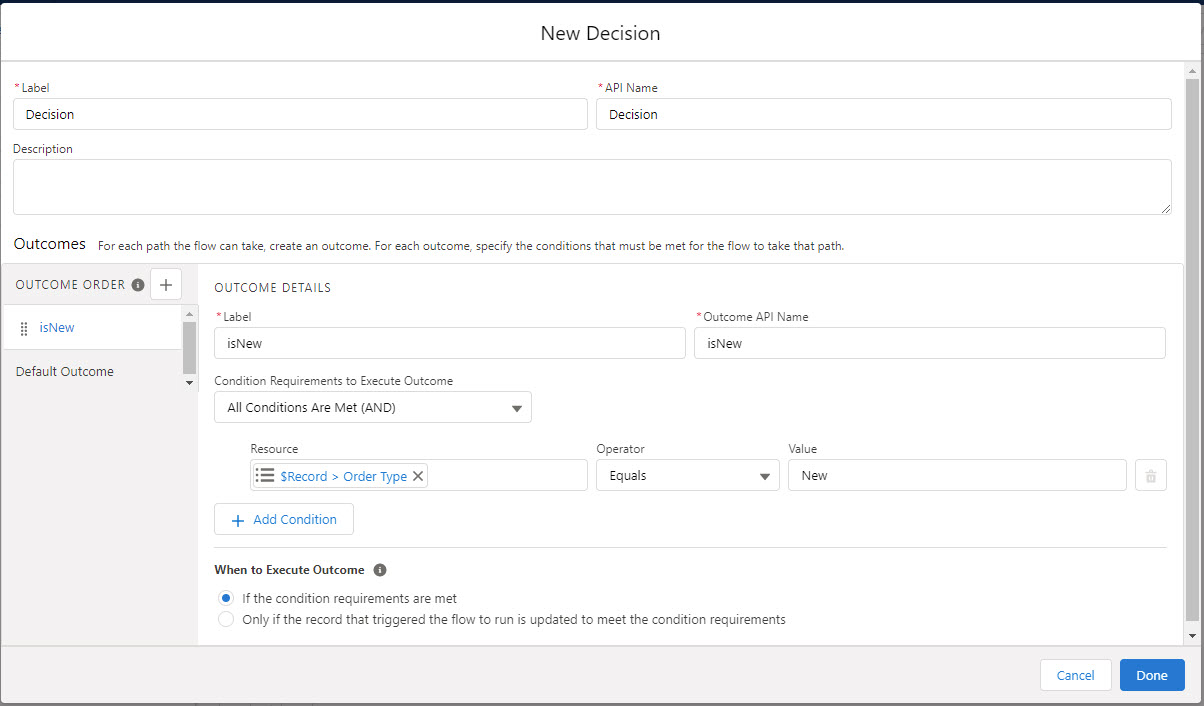
- Below the outcome, set:
When to Execute Outcome: If the condition requirements are met
- Click the + icon to add another outcome then for the second New Outcome, set:
Label: isAmendment
Condition requirements: All conditions are met (AND)Add the following condition:
{!$Record.Type} Equals Amendment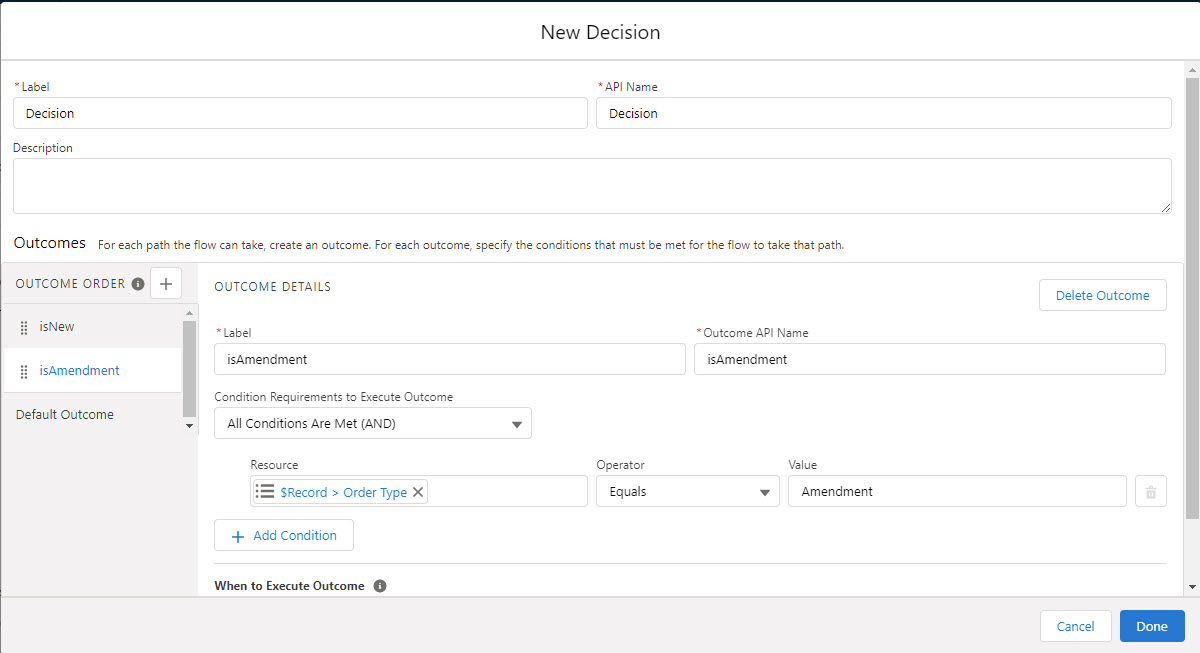
- Click Done.
- In the Flow Builder user interface, go to the Toolbox section on the left-hand side of the page and click on Manager then click the New Resource button. On the New Resource window, set the Resource Type to Variable, then set the following:
API Name: VEngagementRecord
Data Type: Record
Object: Engagement
Available for input: True
Available for output: True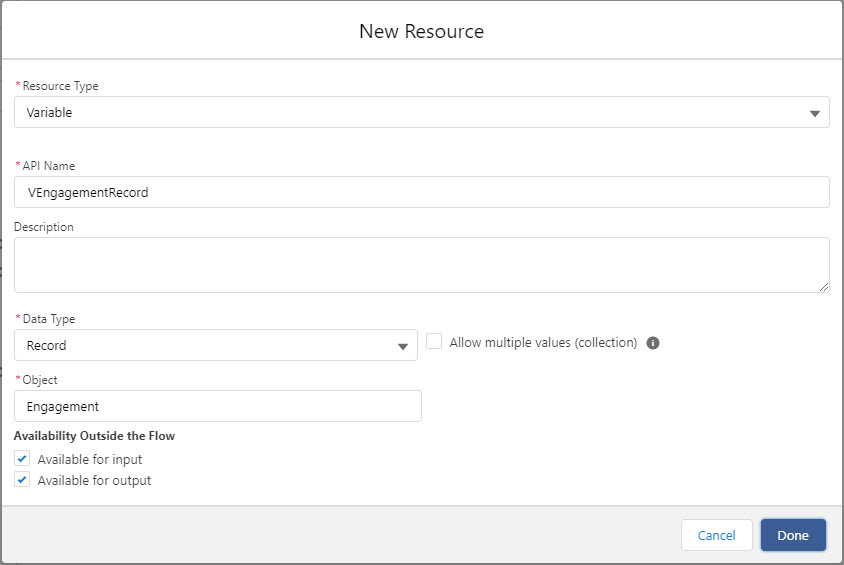
- Click Done.
- Click the + symbol between the isNew Outcome and the End Icon, then choose to add a Create Records element.
- On the New Create Records window, enter a label and API name then set:
How Many Records to Create: One
How to Set the Record Fields: Use separate resources, and literal values
Object: Engagement (This object's API name is fferpcore__ff_Engagement__c.)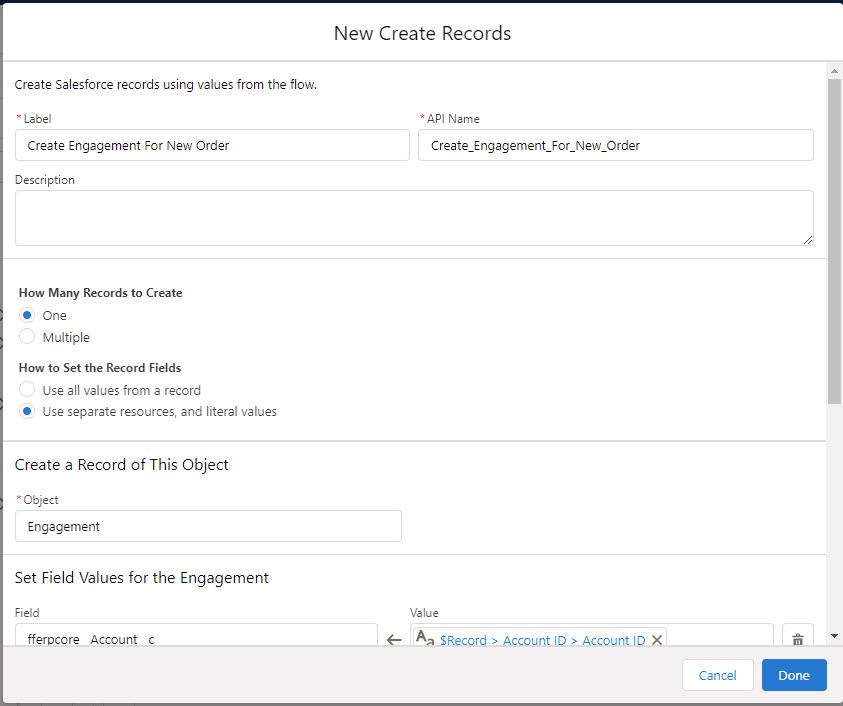
Make the following assignments in the Field Values for the Engagement section to populate fields on the engagement with values from the order:
fferpcore__Account__c = {!$Record.Account.Id}fferpcore__StartDate__c = {!$Record.EffectiveDate}fferpcore__EndDate__c = {!$Record.EndDate}fferpcore__Description__c = {!$Record.OrderNumber}ffrrLegalEntity__c = {!$Record.ffrrLegalEntity__c}Complete the fields below the list of assignments as follows:
Manually assign variables: selected
Store Engagement ID in Variable:{!VEngagementRecord.Id}(this is the ID of the record variable you created at step 12)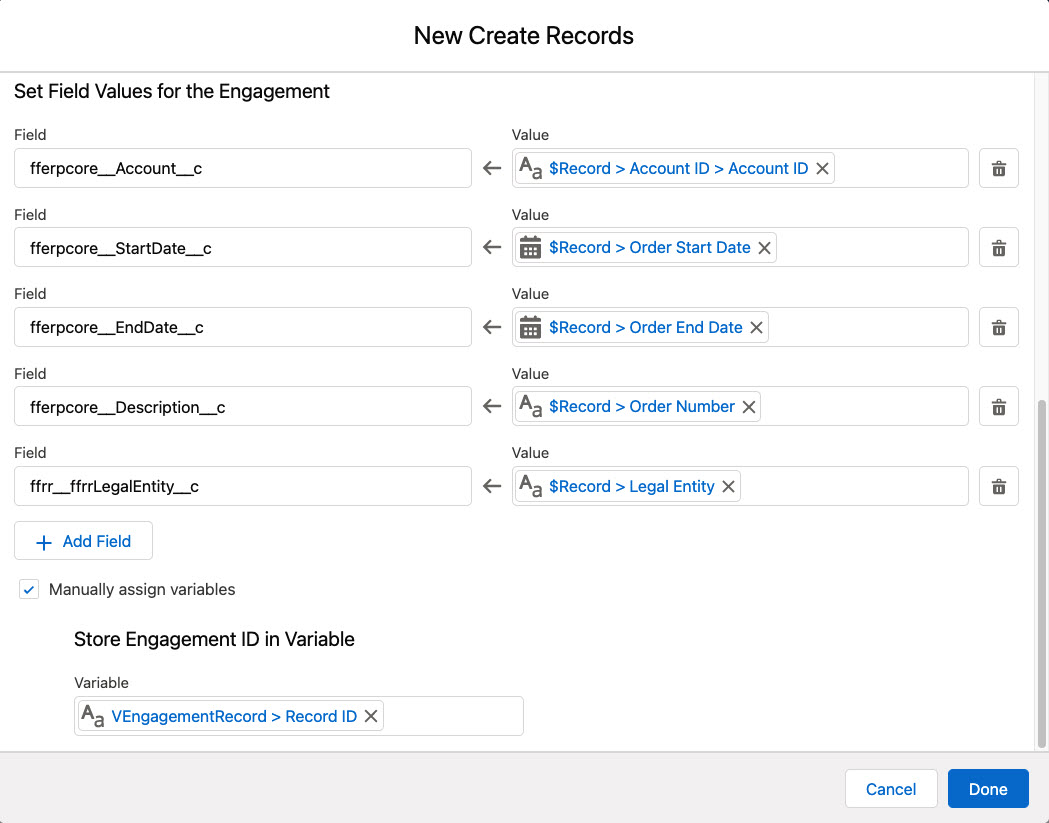
- Click Done.
- Click the + symbol between the Create Records node and the End Icon, then choose to add an Update Records element.
- On the New Update Records window, enter a label and API name then set:
How to Find Records to Update and Set Their Values: Use the order record that triggered the flow
Set Filter Conditions: None--Always Update RecordMake the following assignment in the Set Field Values for the Order Record section to populate the Engagement field on a new order with the engagement ID:
ffrrEngagement__c = {!VEngagementRecord.Id}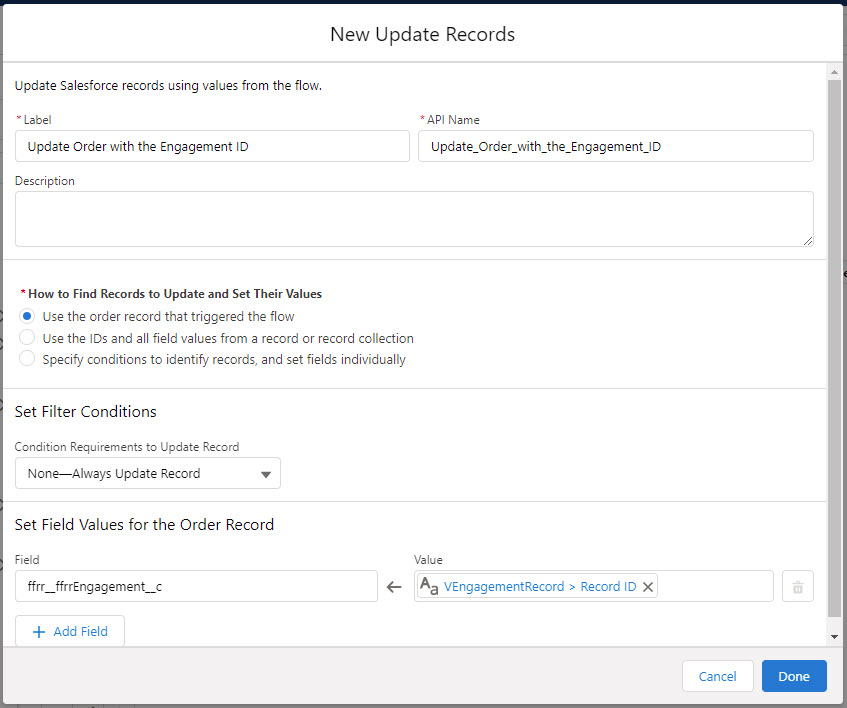
- Click Done.
- Click the + symbol between the isAmendment Outcome and the End Icon, then choose to add an Update Records element.
- On the New Update Records window, enter a label and API name then set:
How to Find Records to Update and Set Their Values: Use the order record that triggered the flow
Set Filter Conditions: None--Always Update RecordMake the following assignment in the Set Field Values for the Order Record section to populate the Engagement field on an amended order with the same engagement ID that was on the original order:
ffrrEngagement__c = {!$Record.Opportunity.SBQQ__AmendedContract__r.SBQQ__Order__r.ffrr__ffrrEngagement__c}
- Click Done.
- Save your flow then click Activate.
When you activate a new order, an engagement is created and the engagement number is stored on the order. If that order's contract is later amended and an order amendment created, the engagement number from the original order is written to the order amendment. A revenue contract created for the engagement will therefore include performance obligations for items on both the original order and the order amendments.