Creating a Customer Quotation
You can create a customer quotation from the Customer Quotations page or from the Opportunity Detail page.
Customer Quotation Page
To create a quotation from the Customer Quotation page:
- Click the Customer Quotation tab.
- Click New.
- Select the required Record Type from the Record Type drop-down list.
- Click Continue.
-
The fields that you must complete vary depending on the type of customer quotation you are creating. If you are creating a standard service contract, flex service contract, or a change request, enter the service term and service term number.
- Select the customer account for the quote from the Customer Account lookup.
- Click Save.
You can create a customer quotation from an opportunity if the stage is not "Closed Won" or "Closed Lost". When you create a customer quotation from an opportunity, the parent account addresses are copied to the record. You can override the default "Bill to" and "Ship to" addresses.
Opportunities Page
To create a customer quotation from an opportunity:
Click Create Customer Quote from the Opportunity Detail page.
Adding Lines to a Customer Quotation
To add lines to a customer quotation:
- From the Line Items tab on the customer quotation page, click
 to add a new line.
 - In the Item to Quote column, enter an item for the customer quotation line. You can start typing the item and then select it from the drop-down list once it displays.
- Enter a quantity for the line.
- [Optional] Complete the remaining fields as required. For details of other fields, see Customer Quotation Fields.
- [Optional] Repeat steps 1-4 as many times as required to add more lines.
- Click Save.
Adding Multiple Items to a Customer Quotation
If you do not know the exact name of items that you want to quote for, you can search for and add those items to the customer quotation.
- On the Customer Quotation page, click Add Multiple Items.
- In the Filters panel, to search for an item, either enter a few letters, the full name, or the item description.
- [Optional] Enter a value in the Supplier, Manufacturer, and Product Group fields.
- [Optional] Select an option from the Additional Search Criteria field menu. In the adjacent field, search for a value related to the selected option.
- Click Apply. Items related to the search are displayed under the Item Masters, Supplier Catalog and Price Lists fields. The Supplier Catalog and the Price Lists fields are displayed only when the Search Supplier Catalog and the Search Price Lists custom settings are selected in the Advanced Quoting Settings. For more information, see Advanced Quoting Settings.
- From the displayed list, select the item or multiple items that you want to add to the customer quotation grid.
- [Optional] In the Quantity field, enter the quantity of the selected item or items.
- Click Add to add the selected items to the customer quotation grid.
Editing Lines
To edit existing lines:
- In the grid, change the fields as required for the lines you want to update.
- Click Save.
Cloning Lines
To clone lines:
- Select the checkboxes of the lines you want to clone.
- Click
 above the grid.
 - [Optional] Modify the cloned lines as required.
- Click Save.
Deleting Lines
To delete lines:
- Select the checkboxes of the lines you want to delete.
- Click
 above the grid.
 - Click Save.
Grouping Lines
To group lines:
- Select the checkbox of one or more lines you want to group.
-
Click

 in the toolbar and select Group from the drop-down menu.
- Enter the group name. For example, Electronics, and press enter.
- Click Save to group the selected lines.
Grouping Lines by Product Group
To group lines by Product Group:
- Select the checkbox of one or more lines you want to group by product group.
-
Click in the toolbar and select Group by Product Group from the drop-down menu.
- Click Save. Selected lines are grouped under the preassigned product group.
Ungrouping Lines
To ungroup multiple lines:
- Select the checkbox of the lines you want to ungroup. You can select the lines from different groups.
-
Click above the grid and select Ungroup from the drop-down menu.
- Click Save to ungroup the selected lines.
You can drag and drop a line from its group to Ungrouped Lines and vice versa.
Sorting Groups
To sort groups in alphabetical order:
- Click in the toolbar and select Sort Groups in Ascending Order or Sort Groups in Descending Order as required.
- Click Save.
Editing Lines Using Multi-Inline
Using the Mult-Inline Editing feature, you can select one or more line items and edit. To do so:
- Select the line items that you want to edit.
- On any one selected line item, double-click the value that you want to edit and edit the value.
- Select the checkbox below the value that you edited and click Apply. This applies the changes to all the selected line items at once.
- Click Save to save the changes.
Managing Discount and Pricing
To apply and update discounts for the Customer Quotation and Customer Quotation Lines, perform the following steps:
- Click Manage Quote Pricing on the Customer Quotation page.
- Select the discount type on the Manage Quote Pricing window.
- Enter a value in the New Value field. For example, 20000.
- Click Save to apply and update discounts for the Customer Quotation and Customer Quotation Lines. An information message displays that the discount update process is in progress.
You can price a customer quotation using the Manage Pricing menu.
- Select the checkbox on the column header to select all the lines on the Quotation Lines Grid.
-
Click
 to select any type of pricing from the drop-down menu, such as Cost Plus, List Minus, Set Cost By List Minus, and Profit Margin.
A dialog window opens.
to select any type of pricing from the drop-down menu, such as Cost Plus, List Minus, Set Cost By List Minus, and Profit Margin.
A dialog window opens. - Enter a value. For example, 10.
- Click Apply. A success message displays when the pricing is applied to the customer quotation.
Applying a Rebate
To apply a rebate:
-
Select the line and click
 in the Applied Rebate Amount column. A dialog window opens.
- Select the eligible rebates that you want to apply and click Save.
Passing the Rebate to the Customer
To pass a percentage of the applied rebate amount to the customer:
- Select the customer quotation lines to pass the rebate to the customer.
-
Click and select Rebate from the drop-down menu.
- Enter the percentage of the applied rebate amount you want to pass to the customer.
- Click Apply.
 Using Classic or Lightning Visualforce Pages
There are several ways in which you can create a customer quotation line:
- By using the Add New Line button in the quote line section of a customer quotation.
- By entering the name of a single item to be quoted and clicking Go.
- By adding several customer quotation lines in one go and editing them.
- By searching for an item in Advanced Quoting and creating an item from that search. See Searching for Items and Creating Lines from a Search.
Using the Add New Line Button
This is the preferred option for adding lines to a flex type service contract quotation. The associated popup window enables you enter the service term start and end dates for each line as required.
To add customer quotation lines using the Add New Line Button:
- Click Add New Line in the quote breakdown section of the customer quotation.
- Do one of the following:
- In the top box on the Add New Line popup enter the name of the Item Master The record of a product or a service which is to be sold and/or stocked in a warehouse. An item master might also be referred to as a Stock Keeping Unit (SKU). to be quoted. If you do not know the exact name of the item master, click
 to search for it.
 - If you are quoting for a new item, enter the name of that item in the second box.
- In the top box on the Add New Line popup enter the name of the Item Master
- [Optional] Complete these fields:
- Description
- Quantity
- Condition
- Service Term Start/End Dates
- Supplier
- NRC/RC base fees
- Click Save.
Entering the Name of an Item
You can create a new customer quotation line quickly. To do so:
- Enter the name of your new task in the Enter New Line box.
- Click Go.
- If the Add New Customer Quotation Line popup appears, complete the fields and click Save. Depending on the configuration your administrator has set in the Advanced Quoting Settings custom setting and the type of customer quotation you are creating, the line is either created immediately, or the Add New Customer Quotation Line popup appears.
- Review the line and edit it if required. See Managing Customer Quotation Lines.
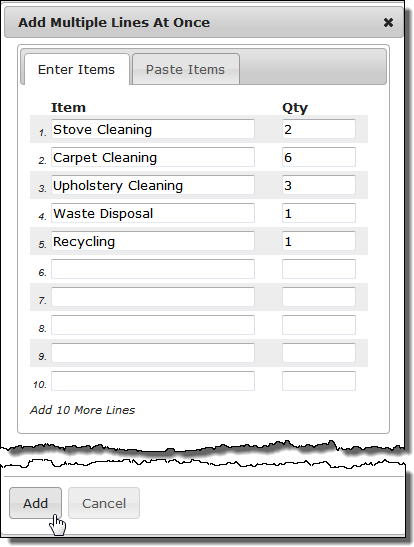
Adding Several Lines at Once
To add more than one line at the same time:
- Click Add Multiple Items.
- Do one of the following:
- Enter the item name and quantity for each new line. If you need more lines, click Add 10 More Lines.
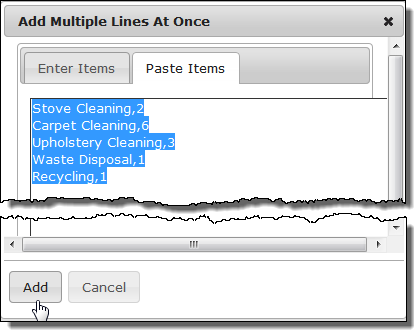
- Click the Paste Items tab and paste the item names and quantities you want using a comma delimited format like this:
- Enter the item name and quantity for each new line. If you need more lines, click Add 10 More Lines.
- When ready to add the lines, click Add.
- Review the lines and edit them if required. See Managing Customer Quotation Lines.