Billing Event Generation Tab
Use this tab to generate multiple billing event batches at the region, practice, or group level, and release them for invoicing at the batch or billing event level. You can also select the types of business record that you want to include, such as timecards, expenses and miscellaneous adjustments.
Using this tab, multiple users can generate and release billing events at the same time. You cannot delete or remove billing events when another user is generating or releasing billing events.
If you want to see more or fewer items on a page, ask your administrator for help.
Generating Billing Events
You can generate billing events:
- For a region, practice, group, account, period and project.
- For more than one project, where they belong to the same region, practice, and group.
- That include time periods prior to the one selected in the Period field.
- For a cutoff date, if you are using flexible billing. This gives you more control over the billing frequency by enabling you to generate the appropriate billing events for the time period types defined on the project or account.
- On a recurring schedule.
To generate multiple billing events:
- From the App Launcher, open the Billing Event Generation tab.
- In the Period field, select the time period that you want to generate billing events for.
- [Optional] We recommend that you select the Include Prior Periods checkbox to generate billing events for past periods in addition to the period you have selected.
Your administrator can define how far into the past you can generate billing events for. Alternatively, if you are using flexible billing, enter or select the cutoff date in the Cutoff field. For more information about flexible billing, see About Flexible Billing Periods.
- If your administrator has set up your org to do so, you can select a sub-region, -practice, or -group to generate billing events for. The top-level RPG
 Abbreviation of region, practice, group. is selected when you load the page.
 - [Optional] To filter the details further, enter the account or project that you want to generate billing events for.
- Select or deselect the checkboxes for the types of business record that you want to include or exclude when generating the billing event.
When you have generated a billing event, the checkboxes revert to the defaults that your administrator has set.
- Click Generate to generate billing event batches for each account that meets your selected criteria. Click Schedule to run a batch job at a specific time in the future. For more information, see Scheduling Billing Event Generation.
The progress of all batches that are currently processing is shown in the Processing Status section at the bottom of the tab. The progress is updated every five seconds.
Successfully generated billing events are displayed in the Process Billing Events section, ready to release.
A Details column in the processing bar status displays information for your billing event selections.
Scheduling Billing Event Generation
You can set up a recurring schedule for the generation of multiple billing events by creating a Salesforce scheduled job.
To set up a recurring schedule:
-
When you have set up the details of the period, region, practice, group or account that you want to create billing events for, click Schedule. The Schedule Generate Billing Events page opens.
-
Enter a unique name for the scheduled job. You cannot create schedules with the same name.
- If you are not using flexible billing, in the Period field, select the time period that you want to generate billing events for.
[Optional] We recommend that you select the Include Prior Periods checkbox to generate billing events for periods prior to that selected.
If you are using flexible billing, enter a number in the Period Offset field. This is the number of days before the schedule's run date that eligible billing records are included in the billing events. Example: If the number is -2 and the scheduled run date is September 2, the generated billing events include eligible billing records up to August 31.
-
Select either Weekly or Monthly.
Weekly
- Select one or more days for the job to run.
- Select a time for the job to start.
Monthly
- From one of the monthly options, select when in the month you want the job to run.
- Select a time for the job to start.
- Click Schedule. The scheduled job ID is displayed.
If you have administrator access, you can monitor the progress of the job:
- From Setup, click Monitoring | Scheduled Jobs.
- Click Manage on the row for the job that you want to manage.
Removing Billing Events
After reviewing the billing event details, you can remove any billing events that you don't want to release by reverting the billing process. This deletes the selected billing events and their billing event items, and reverts associated records to a state where they are eligible for billing again.
To remove generated billing event batches, billing event or billing event items:
- In the Process Billing Events section, select the checkboxes for the billing event batches, billing event or billing event items that you want to remove.
- Click Remove. The removed items are no longer shown in the list.
Releasing Billing Events
After generating billing events, but before releasing them, you can:
- Filter the table of generated batches in the Process Billing Events section by:
- Entering a region, practice or group. If the field that you want to filter by is not visible, ask your administrator for help.
- Entering an account or time period.
- Selecting a category from the drop-down list.
- Selecting the Pre-Bill checkbox.
- Sort the list of generated billing events in the table by clicking the column headers.
To release generated billing events:
- In the table in the Process Billing Events section, select billing event batches, billing events and billing items to release.
You cannot release billing event items without their parent billing event, but you can release individual billing events without their parent billing event batch.
- Click Release.
The progress of all batches that are currently processing is shown in the Processing Status section at the bottom of the tab. The progress is updated every five seconds.
Billing events that are successfully released are removed from the table.
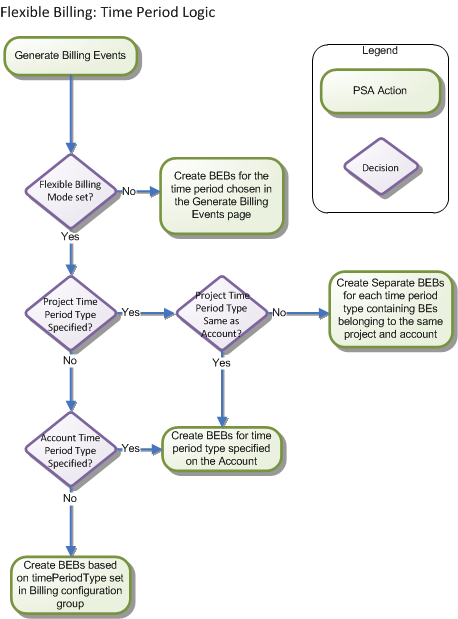
About Flexible Billing Periods
If your administrator has configured PSA to use flexible billing, you can select a cutoff date instead of a time period to use for project and account billing events. Billing events are generated for time periods that end on or before the date you specify. The diagram below shows how PSA selects the time period type.