Setting up Certinia Highlight Percentage Cards
This topic describes how to add and configure an FDN Highlight Percentage Card component on a Lightning record page. For more information about the overall process, see Adding Customizable Lightning Components to Certinia Lightning Pages.
The card displays the value contained in a percentage data type field or relevant formula fields on an object's Lightning record page. You can set thresholds that determine the color of the card. If you don't set a threshold the card uses a default color.
The card enables you to display a percentage value, a label, a threshold color, and a progress bar.
To add a percentage card to a Lightning record page:
- Edit the Lightning record page you want to add the component to. Lightning App Builder is displayed.
- From the custom components list, drag the FDN Highlight Percentage Card component on to the record page.
- In the properties pane, add the following details, as needed:
- Select the percentage field that you want to display the value of.
- [Optional] Enter a title for the card. Leave this blank to use the field name that you have selected in Percentage Field.
- [Optional] Select a default color for the card. This is the color used when a threshold value is not defined or the value is between the threshold values.
- [Optional] Enter a value between 0 and 100 for the higher threshold. Card values higher than this are highlighted with the color defined in the Greater Than Threshold Color field.
- [Optional] Select a color for the card when its value is higher than the value in the Greater Than Threshold Value field.
- [Optional] Enter a value between 0 and 100 for the lower threshold. Card values lower than this are highlighted with the color defined in the Less Than Threshold Color field.
- [Optional] Select a color for the card when its value is lower than the value in the Less Than Threshold Value field.
- [Optional] To hide the progress bar, deselect the Show Progress Bar checkbox.
- Click Save.
For more information on controlling component visibility, see the Salesforce Help.
 Example Highlight Percentage Card
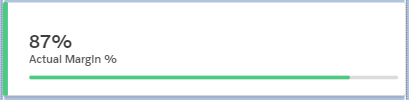
The following table shows a configuration of a percentage card that displays the details of a project's actual margin.
| Field | Value | Details |
|---|---|---|
| Percentage Field | Actual Margin % | The value of this field is displayed on the card. |
| Percentage Title (Optional) | - | As this is blank, the title of the field Actual Margin % is displayed. |
| Default Color (Optional) | Orange | The default color of the card when the card value is within the threshold limits or there are no threshold values. |
| Greater Than Threshold Value (Optional) | 75 |
If the field value is higher than this, the card is green. |
| Greater Than Threshold Color (Optional) | Green | The color used when the Greater Than Threshold Value field is calculated. |
| Less Than Threshold Value (Optional) | 50 | If the field value is lower than this, the card is red. |
| Less Than Threshold Color (Optional) | Red | The color used when the Less Than Threshold Value field is calculated. |
| Show Progress Bar | Selected | A visual representation of the percentage value of the card. |